Paypal IPN Listener: It is a required setting for Recurring Payments. By configuring this setting, you will be able to be informed about the developments in the Recurring Payment system. PointFinder payment infrastructure tracks these kinds of payments from the system and cancels the “Recurring” feature by changing the status of the uploaded item as “Pending Approval” and the payment status as “Pending Payment”, if the agreement is terminated or the payment is not made. In the case that the payment is made regularly, it will continuously update the expiry date of the item.
Information:
Our system keeps records of cancelation, renewal, and deleting processes to be performed and adds a record to the payment card of the item which is on the “PF Orders” table for information purposes. Using this feature, you can track all processes made by the system on the item automatically without your knowledge.
Setting Up IPN Notifications on PayPal
The following procedure describes how to specify and activate the URL for your IPN listener in your PayPal profile.
Your listener must be located at the URL that you specify in the profile. Before you activate your listener on PayPal, you should test the listener using the IPN simulator in the sandbox.
The steps to set up your listener for Sandbox testing and to set up your listener for live operation on PayPal are the same. The only difference is that you log into the sandbox to set up your listener for Sandbox testing and you log into PayPal to set up your listener for live operation.
Note: Sandbox testing goes beyond simply using the IPN simulator. The IPN simulator only sends IPN messages to a listener; it does not perform the complete operation; for example, it does not complete a transaction. Sandbox testing involves performing the same actions in the sandbox as you expect to be performed when the listener goes live.
After you log in, follow these instructions to set up your listener:
- Log in to your PayPal business account at www.paypal.com.
- Click the settings icon at the top of your PayPal account page and then click Account Settings.
- On the Notifications page, click the Update link for the Instant payment notifications item.
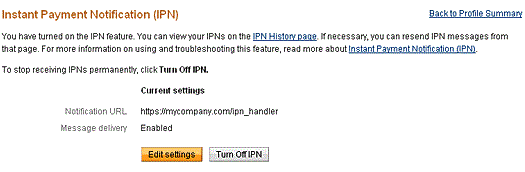
- Click Choose IPN Settings to specify your listener’s URL and activate the listener. The following page opens:
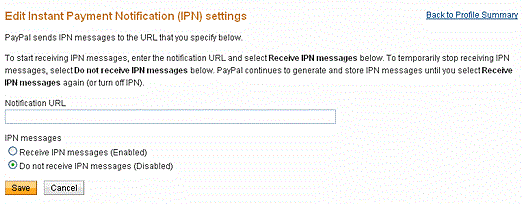
- Specify the URL for your listener in the Notification URL field. (You should use your website DASHBOARD URL. Ex: https://www.pointfindertheme.com/dashboard/)
- Click Receive IPN messages (Enabled) to enable your listener.
- Click Save. The following page opens: